
| Wattage Sukhoi 31 EP Aerobatic Park Flyer |
I'd built a number of electric flight models, which have been mostly powered gliders, and for a no apparent reason that I can think of, I'd always had more fun with the smaller 400 powered models. Perhaps it was just the surprise that a relatively small motor/battery pack was capable of delivering a good performance. Also…if I'm honest… I'd had disastrous experiences with two 600 aerobat types. ESPM (Ego Self Preservation Mode) prevents me from explaining further!!
 So
I found that I had started to generate an interest in building a small,
aerobatic (foam?) model for use in restricted fields and on holiday etc.
Then, at one of the Old Warden modelling days, I thought I might have
found what I had been looking for in the quick build Wattage Sukhoi 31
kit on offer at the Moor Models stand for £30.
So
I found that I had started to generate an interest in building a small,
aerobatic (foam?) model for use in restricted fields and on holiday etc.
Then, at one of the Old Warden modelling days, I thought I might have
found what I had been looking for in the quick build Wattage Sukhoi 31
kit on offer at the Moor Models stand for £30.
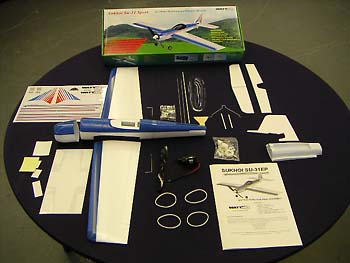
The lid informed me that "the Sukhoi SU-31 EP features compact, lightweight design for small field flying" and that it's properties included "Exiting flight characteristics - fast and aerobatic park flyer".
After a quick look in the box, the re-usable Plastic Modelling Voucher was out of my wallet and a purchase had been made! I don't suppose I'm alone in this but I find that when I look at a kit for the first time, there are always a number of 'items' that really grab the attention. Certainly this was the case for me with this little kit.
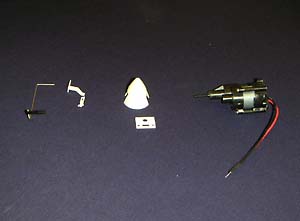
 There's
a sexy, super lightweight spinner (I must consult the analyst again),
assembled motor gearbox unit, excellent quality miniature clevises and
accessories, plus a superb instruction manual (more anon). The item that
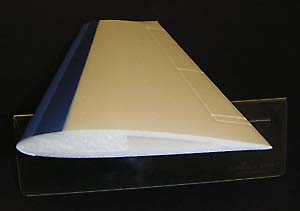
really caught my eye though, was the wing. It's constructed from a wire
cut foam D section that forms the leading edge, around which appears to
be wrapped "Depron" foam sheeting, neatly cut/moulded to create
the remainder of the wing section, the whole thing being covered in a
thin, clear plastic covering to seal the foam. Two halves are supplied
(ailerons already cut and hinged) that just require butt joining to produce
a wing that is accurate and very light. I really think the wing is one
of the best pieces of engineering I've seen anywhere.
There's
a sexy, super lightweight spinner (I must consult the analyst again),
assembled motor gearbox unit, excellent quality miniature clevises and
accessories, plus a superb instruction manual (more anon). The item that
really caught my eye though, was the wing. It's constructed from a wire
cut foam D section that forms the leading edge, around which appears to
be wrapped "Depron" foam sheeting, neatly cut/moulded to create
the remainder of the wing section, the whole thing being covered in a
thin, clear plastic covering to seal the foam. Two halves are supplied
(ailerons already cut and hinged) that just require butt joining to produce
a wing that is accurate and very light. I really think the wing is one
of the best pieces of engineering I've seen anywhere.
Two pieces of moulded, dense foam form the fuselage, the split being horizontal lengthways, and the tail surfaces are (die?) cut "Depron" sheet. Various other parts complete the kit including a moulded lightweight plastic cowl, battery holder, canopy, undercarriage and tailskid, and a set of alloy tubes for the rubber band mounted wing (yuk).
There is also a sheet of approx 1mm thick "sticky back plastic" with a number of pre-cut "reinforcement pads" die cut into it. These are stuck onto the model in a number of places to increase strength, I noticed that the whole sheet was quite heavy.
 I
said that I'd describe the manual. The level of detail is higher than
anything I'd come across before. There are several lists describing: a)
parts in the kit, b) tools and materials required, c) radio equipment
and batteries required and d) available spares.
I
said that I'd describe the manual. The level of detail is higher than
anything I'd come across before. There are several lists describing: a)
parts in the kit, b) tools and materials required, c) radio equipment
and batteries required and d) available spares.
Construction is as usual, divided into sections (wing etc), but each individual step is meticulously described, against each of which a "tick box" is provided to ensure you don't miss one out. Many useful photographs illustrate points made in the text.
One of the introductory sections of the manual goes to great pains to describe the radio equipment you will require. Not surprisingly, the recommendations are for largely Wattage equipment, but also stated are equipment specifications, i.e. weight, and torque ratings, voltage/current ratings, so it's easy to select appropriate gear from alternative suppliers. I found this very useful, as having not built such a small model before, I really had no feel for what size servo etc would be best.
Construction
First job then, is to join the wing. This is a fairly conventional operation;
the roots are sanded to ensure a good joint with the largest contact area
possible with the recommended amount of dihedral. Prior to gluing together
(with epoxy) the manual states contact surfaces must be cleaned with "rubbing
alcohol". It's important with any bonded joint to ensure surfaces
are clean and dry.
With foams and plastics, this means you also need to ensure any release agents are removed, it's therefore doubly important to ensure all the bonding surfaces are cleaned just prior to joining. I used methylated spirits, although the "rubbing alcohol" term refers to Surgical Spirits. I'm sure a number of solvents could be used but it must be born in mind that many solvents can destroy the foam. It's always a good idea to test the solvent to be used on a scrap section of the material.
Having glued together the wing halves, the lateral strength of the wing is reinforced first with runs of Magic Tape running tip to tip. Two plastic reinforcement 'pads' are removed from the pack and stuck on the upper surface of the wing. See photo. Aileron cranks are fitted into grooves cut into the aileron, then held in place with tape and reinforcement pads. I found the ailerons very stiff to operate and throw was extremely limited on the downward movement, so I carefully used a scalpel to slice away foam from inside the pre-cut slot. In hindsight, it would probably have been easier to have just cut out the aileron, increased the chamfer at the joining edge and then hinged with Magic Tape.
A slot is cut centrally into the wing to accept the servo in the time-honoured manner. Two pieces of reinforcement pad are placed on the surface of the wing for the servo screws. The servo was then fitted and linked to the control surfaces with the supplied lightweight control rods. As stated earlier, these fittings are superb, small, lightweight and adjustable.
 Fuselage
The two pieces of foam that form the fuselage are packaged held together
by some sticky tape. Beware, I found it impossible to take the tape off
without removing some of the blue paint. Prior to epoxying the halves
together I found some careful trimming with a scalpel was required to
get them to fit together properly. Next, the specified radio gear fits
neatly into the fuselage.
The elevator/rudder servos are a push fit in between the fuselage sides and it's recommended that they're held in place with a blob of epoxy. I didn't want to do this to my nice new servos, plus I thought I might want to remove them for use in other models. I therefore fitted small wooden beams in the usual manner across the fuselage and screwed the servos to them (only 2 -3 grams weight).
 Fortunately
for me, I deviated from the manual at this point. I couldn't resist "demo"
fitting the wing at this point and found the aileron pushrods fouled on
the elevator/rudder servos! The glue on the beams wasn't dry so I pushed
the beams and servos further into the fuselage. Good as it is, it just
shows you that you can't switch off and follow the manual blindly! As
it appears that more and more kits and ARTF's are produced with such detailed
manuals, I guess the point to bear in mind is keep aware and use your
brain.
Fortunately
for me, I deviated from the manual at this point. I couldn't resist "demo"
fitting the wing at this point and found the aileron pushrods fouled on
the elevator/rudder servos! The glue on the beams wasn't dry so I pushed
the beams and servos further into the fuselage. Good as it is, it just
shows you that you can't switch off and follow the manual blindly! As
it appears that more and more kits and ARTF's are produced with such detailed
manuals, I guess the point to bear in mind is keep aware and use your
brain.
The tail plane/elevator and stabiliser/rudder are pressed out of the Depron
outer, the tail plane is then strengthened by gluing a 3mm fibreglass
rod to the edge at which the elevator will be joined. Hinge the elevator
and rudder using "magic" tape and glue both in place. Now fit
the superb micro control horns to the rudder and elevator. These push
through a pre-cut hole in the control surface and a flat plastic "plate"
slides over the horn, clicking and securing it into place. Finally fit
the pushrods and link to the servos.
 A
nicely pre-cut ply firewall is epoxied to the front of the fuselage and
when dry, the motor gearbox unit is fixed to it with three self-tappers.
The undercarriage legs are also sandwiched between the gearbox and firewall.
I must say I wasn't happy with the quality (or the 7gm weight) of the
supplied wheels, they looked more like draughts counters. These were replaced
with lightweight Multiplex ones (2 gms each) that looked and worked much
better, However, I did have to make a new undercarriage leg from piano
wire as the Multiplex wheel bearings were wider.
A
nicely pre-cut ply firewall is epoxied to the front of the fuselage and
when dry, the motor gearbox unit is fixed to it with three self-tappers.
The undercarriage legs are also sandwiched between the gearbox and firewall.
I must say I wasn't happy with the quality (or the 7gm weight) of the
supplied wheels, they looked more like draughts counters. These were replaced
with lightweight Multiplex ones (2 gms each) that looked and worked much
better, However, I did have to make a new undercarriage leg from piano
wire as the Multiplex wheel bearings were wider.
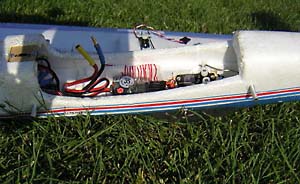
Now it's time to fit the ESC and receiver, these are servo taped into the fuselage. Because it was difficult to get access to the rear of the motor, I soldered together the ESC output leads to the motor cables, the joint being protected with heat shrink tubing. CAREFUL, despite using a heat shield, my hot air gun slightly spoiled the surface of the fuselage, but no structural damage was done. The metre long arial (yes 1 metre) was taken through the side of the fuselage and taped to the top of the fin.
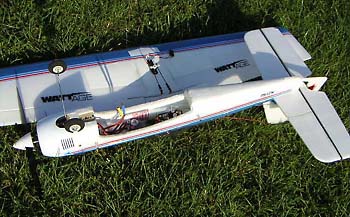
Finally, the battery box is fitted. This is a lightweight plastic moulding that is glued on the underside of the wing, the batteries fitting in a slot. The wing and batteries being held in place with elastic bands.
Cowl and Canopy.
The cowl is cut to shape using a pair of small scissors. It then slides
into place over the gearbox output shaft, and locates on the foam fuselage.
Two small screws hold the cowl in place, these biting into two pieces
of the sticky back re-enforcement board stuck onto the foam. I didn't
like this idea as I didn't think it wouldn't last and glued two pieces
of 0.5 mm ply to the fuselage side. The canopy is fitted in a similar
manner.
 Down
To The Flying Field
Down
To The Flying Field
I didn't yet have the recommended 9.6V 5/4 AAA NiMh's, but I'd got to
the point where I wanted to set up the radio for the Sukhoi. I did own
an overweight 8.4V 900 mAh NiCd however, so the next time I went flying
I took two models plus the Sukhoi with me just to set up the radio. Having
set up the control throws on the Sukhoi, I geared up my two other models
for flight, and found each had servo problems, (serves me right for turning
up posing with three models). The only model left capable of flight now
is the Sukhoi!
Now then, what should I do, I've already made myself look a right Folland
Gnat with the quality of my preparation of the two other models. Surely
I shouldn't fly this new, unflown and overweight model, ESPM should be
kicking in and I should be off home!!
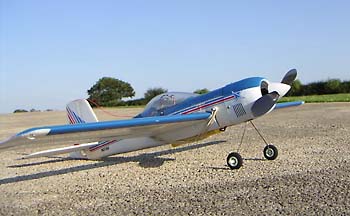
You've guessed it, next thing the Sukhoi is scampering across the runway,
sounding like a large Scalectrix car, its speed surprising me. I also
remember hearing a comment in the background from a fellow club member
"He's going to take off from the ground". I tried to keep the
Sukhoi's climb fairly flat as the instructions suggested, and "went
around" the field trimming it out. I don't remember too much about
what trim it required to be honest, I was still surprised at its turn
of speed. Hmm, it's very stable and with surprisingly smooth and slick
controls for a lump of foam.
 Then
a few aerobatics were put in, rolls were fine and at scalish rate (bit
slow for this span of model) and rather barrelly. Good looping performance
with both medium and quite large loops being possible. By now, I've got
two or three (very competent competition) fliers gathered round me. "Will
it prop hang", "I don't think so" I replied, and it was
about time to think about landing. All were suitably impressed (me most
of all) with the little Sukhoi's performance.
Then
a few aerobatics were put in, rolls were fine and at scalish rate (bit
slow for this span of model) and rather barrelly. Good looping performance
with both medium and quite large loops being possible. By now, I've got
two or three (very competent competition) fliers gathered round me. "Will
it prop hang", "I don't think so" I replied, and it was
about time to think about landing. All were suitably impressed (me most
of all) with the little Sukhoi's performance.
Next time out was with pre-cycled packs of the 9.6V 5/4 AAA's. This significantly
improves flight performance and the duration. I normally get flights in
excess of eight minutes with 9 minutes 10secs being my P.B. but you do
need to manage the throttle to do this. Performance in relatively high
winds is also surprisingly good. I've had a number of flights where the
Sukhoi has performed at least as well as "conventional" models,
but I must say the flight duration reduces (to around 6 minutes) due to
the need to keep the throttle full on.
Niggles
After the first flight, I found the nuts holding the propeller in place
were coming loose. A friend of mine who owned a Wattage Tangent had previously
told me that the gearbox output shaft had had pulled out of the plastic
gear it was moulded into. We had put this issue down to inertia as the
motor winds up/decelerates. The fix I used was to programme in a 1.5 second
response delay in the Tx throttle function, no more problems since. I
guess a touch of threadlock would also help, but you'd have to be careful
not to get any on the plastic propeller.
The odd rough landing or two pulled the plastic tailskid off the bottom of the fuselage; I had to glue this back on a number of times. Eventually, the skid broke, allowing the rudder to contact the ground. In the same move, this broke the fin. The fin was easily glued back in place, but I didn't want a repeat of this. My solution was to cut off the bottom 5mm of the rudder and allow the remaining "pad" of the skid to protect the fuselage from being abraded on the tarmac.
Right, OK, then, disable ESPM, I went to pick the model up from the tarmac after landing. So I bend down, grasp model, move back upright, there's a strange graunging sound. Looking down. My foot had been resting on this 1 metre long arial and it has ripped like a cheesewire through the stabiliser, see photo. Sob, enable ESPM. To prevent this happening again, I cut a piece of Depron to act as a former and wrapped the initial 600mm of the arial around it, then routing the remainder in the previous fashion to the fin. Since this modification, I have had no glitches or radio problems and will definitely use this technique again where I use such long antenna on small models.
Possible Improvements
I believe it's possible to substantially lighten the airframe by reducing
the number of re-enforcement pads used, in particular discarding the large
pad that sits on top of the wing. To do this I would strengthen the wing
with a 1mm carbon fibre rod inserted in the "D" section, I would
also replace the elevator/rudder pushrods with CF. The other obvious area
for great improvement is the use of a brushless motor and LiPo cells.
We'll have to see if I do it, I'll let you know if so.
Conclusions
Does it do what it says on the tin? Yes, it certainly does, the "fun
per pound spent" ratio being very high. Whilst I've tried to be as
objective as possible about this review, you can see that I don't have
a lot of critisim for it. That's because I really do like it (that's why
I wrote the review) and rate it as the second best model I've ever built.
To this extent I've bought another kit (Overlander £27.50). I never
thought I'd say that about a lump of foam.
STOP PRESS!!
Model crashes from 60 odd foot height onto grass due to total radio wipe-out.
No damage what so ever visible to the airframe!!! Motor and ESC totally
burnt out though. Was this the cause or did this happen after the crash,
I tend to think the latter. The area in which I had been flying, two other
flyers had reported interference previously.
Immediately after the crash, I frequency scanned whole band, no evidence
of spurious emissions. My radio appeared to work ok after crash, but have
not yet been able to perform full range check. The model is now repaired,
but yet to fly due to the wet weather, keep you informed.
Wattage
Sukhoi is available from:
Most good Model Shops
| Technical Details - ARC Modelfly Beaver Experimental | |
| Manufacturer | Wattage |
| UK Distributor |
|
| Aircraft Type: | Electric Powered Semi-Scale Aerobatic Park Flyer. |
| RRP: | £30 approx. |
| Wingspan: | 25 ins |
| Wing Area: | 140 sq. In |
| Length: | 20.5 ins |
| Power: | 370 motor w/3.7:1 Gear box |
| Weight: | 11.5 - 12.5 ounces |
| Number of Channels: | 4 channel micro system w/3 micro servos |
| Control Functions: | Elevator, Aileron, Throttle, Rudder, |
| Construction: | Depron type of foam |
| Likes | Dislikes |
|
|
Please
mention 'Flying Sites'
| Info Panel |
|
Wattage
Sukhoi 31 EP |
| Comments: Does it do what it says on the tin? Yes, it certainly does, the "fun per pound spent" ratio being very high. |
| Price: £30 |
| See Technical Details Below |