

![]()
![]()
![]()
![]()
![]()
![]()
![]()
![]()
![]()
![]()
![]()
![]()
![]()
![]()
![]()
![]()
![]()
![]()
![]()
![]()
![]()
![]()
![]()
| GWS Formosa Upgrade |
 Some
months ago, I bought a GWS Formosa as I wanted a small electric model that
I could fly when conditions were not right for slope soaring and at the
same time improve my powered flight skills. The clinching factor in my choice
was that it comes complete with a motor for £25!
Some
months ago, I bought a GWS Formosa as I wanted a small electric model that
I could fly when conditions were not right for slope soaring and at the
same time improve my powered flight skills. The clinching factor in my choice
was that it comes complete with a motor for £25!
It should say what I thought of the model that when I finally decided that further repairs were impractical (after taking the model to my Mother's place in Spain and two lots of baggage handlers had their way with her!) That my first call on my return was to the Cashpoint and my second was to Channel 4 where I bought a replacement!
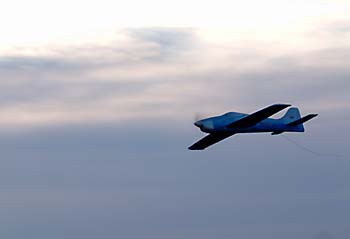
The Formosa is foam low wing monoplane 912mm long and 900 wingspan. It comes with a 370 motor with gearbox.
New
Motor
I had tried various motors on my first one, starting with the stock motor,
then using the "bicycle bell" type brushless and finally a small
inrunner brushless with the stock gearbox. But a mate who has one had
used an AXI outrunner with LiPo's, and the performance was superb. So
when I found an outrunner in a model shop in Spain, I jumped in with both
feet! My mate paid about £150 for 2 batteries, the ESC and motor,
mine cost less than £100.
But the Formosa design is not perfect; there are a couple of weak points in the design which I have sought to improve. The first of these is the rather feeble magnet used to secure the canopy. I have replaced the standard magnet with a far stronger one, which should eliminate the need for a canopy carved from a block of foam and taped on!
More
Mods
Another modification is the rather fragile outer edges of the horizontal
stabiliser. I reinforced these with a couple of lengths of wire that were
excess from the elevator snake! The wire was inserted with epoxy to try
and eliminate the tendency of this part to break off.
The
Formosa has numerous moulding marks; these I filled with lightweight filler
and I lightly sanded the worst of the pimples off. I
have also reinforced the underside with X-weave tape, this was done on
my first one after painting, and looked ugly. I am not certain how the
paint will adhere to this, but I am hoping it will look better. I have
also wrapped the leading edges with tape.
Remounted Motor
As I am not using the stick-mounted gearbox, I had to rethink the motor
mount. As there are 2 holes for sticks in the front, I put a stick in
each and cut a ply disk, which I screwed to the end of the sticks. I then
used the spider mount and bolted the motor to the disk with 3mm bolts
and nyloc nuts.
The motor I have fitted is the XM200 from Dualsky (www.dualsky.com), I also used their TT25A ESC and I later bought a 3cell LiPo cell balancer from Al's Hobbies. I intend to purchase the PC interlink for the ESC at the first opportunity, and the batteries they also supply seem to be good quality and value, although I have not used them. I have had a couple of questions regarding the ESC instructions, which I lost, and UK importers. I have been unable to locate a source for the motors and ESC's in the UK, but I am sure someone will stock them soon! In both cases my emails to Dualsky were answered promptly with full information.
Power
Supply
The motor is suitable for 6-8 Nickel or 2-3 LiPo batteries, weighs 30g
and is 28mm x 20mm. It does 1500 rpm/volt, takes a maximum loading of
8amps and has a maximum efficiency of 75%.
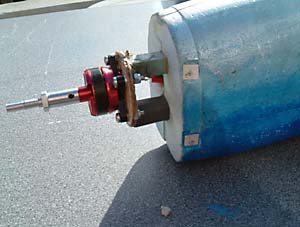
The
Dualsky XM200 motor mounted on the Formosa. Note the lead on the
lower mounting stick,not normally used for the stock motor.
|
On a 3cell LiPo 1300 mah and with a 7x5 folding prop, (better for grass landings) it showed 7.6 amps and 70 watts on a static test. All up weight of the complete model, including motor, battery and balance weights, is 500gms
New
Coat Of Paint
My chosen colour scheme is a little ambitious for my limited experience
of spray painting, but appears reasonably effective from a distance. I
used Tamiya Acrylic paints thinned 50-50, and started by masking off a
stripe running from the cowling along the top of the fuselage and taking
a bend at the tail, leaving the top half of the tail. I sprayed this silver,
along with the cowling and canopy. I sprayed the underside of the wings
and fuselage with a Royal blue.
After allowing what I thought was sufficient drying time, I masked off the blue and silver areas, and added a little silver to the blue paint. As I went upwards along the sides, I added more silver, with the intention of having the sides getting lighter as it went up the sides. This worked after a fashion, but does look a bit blotchy in places; much of this is my lack of spraying ability, but some caused by the propellant canister running out. A replacement canister was needed to finish.
Unfortunately, when I removed the masking tape, some of the royal blue came with it, so this was retouched. One problem was that there were several different surfaces to spray over, filler, tape and foam. These took the paint unevenly, and so look a bit blotchy. Next time I will try an undercoat of some sort.
I finished her with some of the supplied decals, a red, white and blue stripe at the edge of the silver, a name in the same colours on each side and the manufacturers logo on the tail. I also used a name decal on each aileron. The end result is not what I had hoped, but is quite attractive nevertheless.
To
The Flying Field!
The next task was to fly the model! This was undertaken on a very cold
day with light northerly winds, providing a wind chill factor of -5 deg
C! Consequently the flights were of very short duration! Despite the model
being set up within specs, it was found to be a little nose light. Despite
this, she flew in a very manageable fashionable, and looked good in the
air. There was a lot of turbulence from the nearby houses, but she coped
extremely well considering her lightweight.
Control response was quick but precise, and the landing speed considerably reduced over her NiMh equipped predecessor! Although both flights only lasted about 8 minutes in total, there was no discernible drop in power during the flights; a flight of this duration would have flattened the old batteries!
A few minor glitches were apparent after flight. The lower motor mounting stick provided a convenient place for the necessary ballast. On one aileron hinge the glue had let go, and one of the aileron linkages was not glued in place properly. During rectification of the latter, I succeeded in pulling the aileron off! This caused a problem as the hinges become soft and are very hard to push in to their slots. I therefore replaced the hinges with plastic cut from a Margarine tub! I had used this material before on my previous Formosa with no ill effects, so I anticipate no problems this time! In fact this material is far easier to use than the very flexible originals, something I may well bear in mind for a future build!
I have decided that instead of taking a plane with me when I visit my Mother in Spain, I am going to take a kit and build it out there and leave it there! I will probably choose the now available Formosa 2, a slightly larger version of the original. One change I will make in the assembly process will be to put the rudder hinges in place before joining the fuselage halves.
A couple of flights in better conditions and with some lead on the front showed the true capabilities of the model. With no trim adjustment she pulls away from a hand launch and climbs away easily. She is quite stable and pleasant to fly on reduced rates, and has ample power to loop from level flight even on the rates. The roll rate is still pretty good! When full movement is used, roll response is excellent and the loop is very quick. She will even pull up and over from straight and level inverted flight.
In conclusion, the Formosa is a very pleasant model to fly. Easily repairable in the event of a mishap, it is a good choice as a second or third model. As flying skills improve, upgrading the power system opens up new possibilities. A model for all seasons!
[Postscript:
Some new info has just come to my attention that the suppliers of the
Motor and ESC mentioned in my Formosa article now have a UK stockist,
Model Pro in Cornwall. They do not seem to have a website address yet
I believe, they are building the site now, but the email address is model-pro@bigfoot.com]
| Technical Details - Standard GWS Formosa | |
| UK Distributor | |
| Aircraft Type: | Electric Aerobatic |
| RRP for standard Kit | Around £25 |
| Wingspan | 900 mm (35.4 in) |
| Wing Area | 16.5 dmA² (255.8 sq.in) |
| Wing Loading | 21.8~25.5 g/dmA² (7.1~8.4 oz/sq.ft) |
| Weight | 360~420 g (12.7~14.8 oz) |
| Fuselage Length | 912 mm (35.9 in) |
| Number of Channels: | 3-4 Channel |
| Power System | EPS-350C (INCLUDED) |
| Propeller | EP9070/EP8060 (INCLUDED) |
| Standard Battery Required | 7N~8N AAA730mAh Ni-MH |
| Speed Controller | ICS-300 or similar |
| Servo Type | PICO/NARO |
| Control Functions: | Aileron, elevator, throttle (rudder) |
| Construction | All foam plus accessories |
| Likes | Dislikes |
|
|
| Info Panel |
|
GWS
Formosa
Available from Channel 4 & all good model shops (Formosa II now available) |
|
Comments: A model for all seasons! |
| Basic
Price: £25 (See article for Upgrade prices) |
| See Technical Details Below |