

![]()
![]()
![]()
![]()
![]()
![]()
![]()
![]()
![]()
![]()
![]()
![]()
![]()
![]()
![]()
![]()
![]()
![]()
![]()
![]()
![]()
![]()
![]()
| GBD Model Aircraft - Sizzler C/W GWS EDF 40 |
 By Peter Dennis
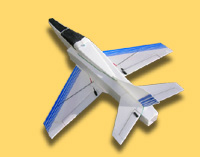
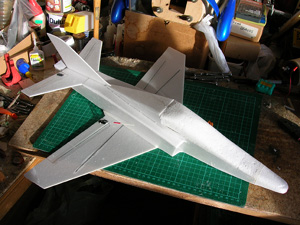
If you were looking for a model for maximum fun but a minimum cost would your first thoughts might not turn to a 20 inch span Depron constructed electric ducted fan model? Well think again!
GBD Model Aircraft's Sizzler, including a GWS 40 electric ducted fan unit comes in at a penny under £30 and at that price has to be excellent value in anybody’s book.
The Sizzler arrived on my doorstep in a plain but sturdy corrugated cardboard box and weighed so little that I wondered if the packer had forgotten to actually put any parts in the box!
 Open The Box
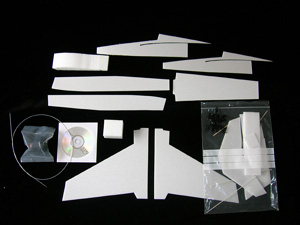
But upon opening the package my fears were allayed. Inside I found many very precisely cut 3mm Depron parts. Also included was a GWS 40 electric ducted fan, a 3mm carbon fibre strip for the wing spar and a bag of assorted parts including Depron type control horns, glass fibre rods for the wing’s leading edges, and the smallest of control snakes I ever seen! There was no printed instruction sheet but GBD Model Aircraft have included a CD/DVD which upon further inspection carried comprehensive instructions in a PDF format. The instructions cover every step in detail including explanatory photographs. If you can’t work directly from your computer screen, you will have to print out them out. This amounts to thirty six pages.
All that is required to finish the model apart from the usual assortment of building tools, is two micro servos of around 6 grams each, a micro radio receiver, a 5 Amp Electronic Speed Controller to suit your system and a 300 to 400 mAh 2 cell LiPo. Oh and of course glue. GBD Models recommend that you use foam safe Cyano for most construction and where some re-enforcement is called for – UHU Por glue.
 Back to the box of bits. Firstly, handle all the Depron cut parts with care. There are several panels with finely cut sections that if mishandled could easily break until you build them into the model. In fact it took me several minutes to work out which panel did what. So a little time spent at this stage will help no end when it comes to putting the panels together.
As with most reviews these days I won’t go into detailed step by step construction processes but just outline the main points that arose during my building of the Sizzler.
Putting Glue to Foam
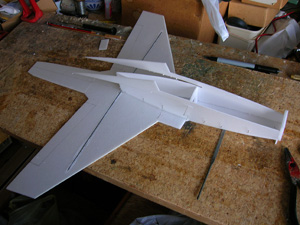
The first step is to join the wings and add the front and rear fuselage bottom sections. The wing’s leading edge is reinforced by letting in 2mm glass fibre rods. Next a narrow slot is cut across the wing and the 3mm carbon strip is added as the main spar. This is glued with foam safe Cyano. Make sure that you do this gluing on a very flat surface so as not to build a warp into the wing. The glass fibre leading edges and the carbon spar makes for a very strong but light weight wing.
 The fuselage bulkheads and front fuselage sides are added next followed by the rear fuselage sides. By this stage you can start seeing how the ducting will work as the intakes are now taking shape.
The GWS fan unit is next up. This is mounted in a bulkhead and a paper tube is rolled and taped to the rear fan unit to produce the efflux. All the dimensions for the fan tube are given in the instructions.
After cutting a small exit hole for the motor’s power leads, the paper tube is taped onto the fan unit. Remember to maintain the tapered paper cylinder all the way to the rear exit. At the exit the tube should remain circular and have a diameter of 35mm. This is very important to achieve successful flight characteristics, as I found out later.
After fitting the fan unit, cutting the ailerons from the wing and hinge taping them, comes the construction of the aileron pushrods. These again are made from very light weight glass fibre rods. The pushrod wires are bent into a ‘V’ for trim adjustments, then Cyano’d to the rods. A heat shrink tube is then slid over the unit and heat from a heat gun is applied to shrink the sleeve. This all makes for very study yet very light units.
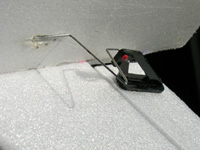 I found that if you are just using a ‘Z’ bend rather than a clevis to connect the pushrod to the control surface horns, some sloppy movement could occur. To get over this I just used a 3mm length of small electrical wire outer sheath, slipped over the ‘Z’ bend and into the control surface horn. Thus providing a neat bush at the connection and preventing any slop in the linkage. (See the little red insert in the photo on the left).
Once the aileron linkage and servo is in place you move onto the elevator linkage. Here GBD Models have supplied the smallest snake (tube with wire inside) that I have ever seen. Yet once set into the model and the elevator servo carefully placed, gives as smooth and precise an action as any large type of snake.
 The trickiest bit of the whole build for me was fitting the two elevator snakes (one to each elevator) through the top fuselage decking and attaching them to the servo. The snake has to pass though the decking before the decking is glued in place. But with a little care and ingenuity and a little manoeuvring of the elevator servo to find the best position, I had it all sorted.
Nearly done now. Just the tail surfaces to glue on, having cut, hinged and horned the elevator, then add the vertical fin with some local re-enforcements and the build was almost complete. The final job is to sand the polystyrene foam canopy block into shape, round off any shape corners and add a few colours and stripes for detail, but don’t go over the top- remember not to add un-necessary weight.
 On The Scales
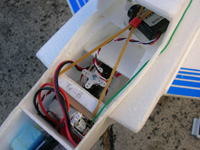
Talking of weight, I used two 6.2g servos and a HiTec ‘Feather’ receiver. Use the battery (in my case a 2 cell 350mAh LiPo), to adjust the position of the centre of gravity. The centre of gravity is probably best set nearer the front mark than the rear. (90mm to 100mm behind the join line of the front fuselage floor and the wing). The radio installation can be seen on the left. (The elastic band is my addition just to tuck away all the wires. The servos are glued in, not held by the band).
The secret of success with any small model is to keep the weight as low a possible. GBD Models suggest that you aim for 110 grams and this is achievable. Although saying that my Sizzler came in a little over this recommended target, at around 125 grams. I really must invest in a set of accurate scales! Control throws should be set to 5mm up and 5mm down on both elevator and ailerons. So now you should be ready to go flying.
To The Flying Field
I have to admit that the first few flights of my Sizzler were not a success! However, let me point out straight away that this was in no way down to the model or its design. It was entirely down to me!
Firstly I tried using a battery that was far too large (and heavy) which meant that I had to add weight to the tail end just to balance the model. Then once I had installed a more suitable battery and removed the tail weight, I could only get half a circuit from the model. It appeared to be lacking thrust.
 Then it dawned on me. Rather than maintaining a nice round efflux on the installed paper tube from the fan unit, I’d pushed the paper into the corners of the rear fuselage section. This now gave a square efflux and a rather larger exit area.
So with a little pushing and gluing I managed to get the efflux back to a rounded shape of the right dimensions (35mm dia). And would you believe it – it transformed the performance! Now we’re talking! My launching colleague, who had always given it perfect send offs, no longer had to work so hard. A good level push and she climbed away as if to say “What was all the fuss about?” The Sizzler climbed straight away before turning down wind and a fair rate of knots. At the end of the down wind leg I gave the Sizzler a good ‘bank and yank’ and she came around without a mummer of complaint.
The flight took place in quite a breeze so I had wondered if the Sizzler would cope as most small park flyers don’t like anything stronger than a gentle zephyr. But no problems, she took the breeze in her stride only slowing up as I turned into wind, but this was transformed into height. Buy the third circuit I tried a roll. This required full ailerons and a small amount of down elevator to maintain height on the inverted side of the roll, so no problems to report.
Before I knew it six or seven minutes had passed and the battery was starting to sag. As I thought about landing her, the battery gave out and the motor stopped – on the down wind leg! I turned her straight back into wind being careful not to scrub off too much airspeed. The Sizzler came around without any hint of a wing dropping and in fact glided on to a smooth landing two yards from my feet.
High Level Fun for Little Outlay
The Sizzler is a great little model with a high level of fun. It goes together extremely quickly and easily with the use of the comprehensive instruction booklet. It’s small enough to put on the parcel shelf of you car and take it anywhere. Its incredible performance for the money has got to seen to be believed and just adds to the big fun factor. It’s certainly good value for the money. Even if you had to start from scratch with micro servos and receiver, ESC and battery you'd still have change from £60.
It’d be such fun to see five of six of these aircraft in the air, all trying to get on the ’six’ of the other. The Sizzler could easily set a new trend in R/C modelling.
And if you like the look of the Sizzler then you will also like the Super Sizzler. GBD Model Aircraft have released an upgraded version using thicker Depron foam and a brushless motor that’s been specially wound by GBD Models themselves. The fan and motor are extra in this case, but I’m told that the model is ballistic.
If you want to see the Sizzlers and the ever increasing range of models, motors and accessories take a look at the GBD Model Aircraft's web site at www.gbdmodelaircraft.com. Everything can be bought online so you can be assured of a fast, reliable and knowledgeable service.| Technical Details - GBD Sizzler | |
| Manufacturer | GBD Model Aircraft |
| Aircraft Type: | Electric Ducted Fan Sport Jet |
| RRP | RRP £29.99 |
| Wingspan | 20 in. |
| Motor | GWS EDF 40 (Fan & motor) included in kit |
| Target Weight | 110g |
| Number of Channels: | 3 Channel Radio |
| Control Functions: | Elevator, Ailerons, Throttle |
| Construction | Depron Foam |
| Likes | Dislikes |
|
|
Please
mention Flying Sites when contacting
GBD Model Aircraft
| Info Panel |
GBD Model Aircraft Sizzler |
| Comments: Its incredible performance for the money has got to seen to be believed and just adds to the big fun factor. |
| Price: £29.99 |
| See Technical Details Below |