
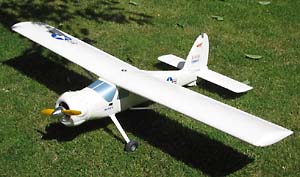
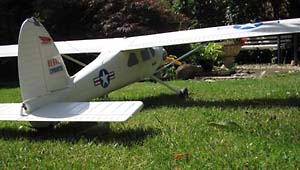
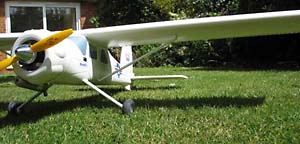
| ARC Modelfly Beaver Experimental |
Defford Model Flying Club
www.mothy.co.uk/dmfc
 Introduction
I have been flying for around 18 months and last year I went through a bad patch where I seemed to writing off a model every time I went out flying. I nearly gave up model flying. But fortunately I had good support from other club members who persuaded me that spending lots of money every week on planes was a very intelligent use of rapidly dwindling resources!
I was advised the Ready 2 would be a good plane as it would stand up to my weekly demolition derby, so that was where I first got involved with plastic ARTF's. I built the Ready 2 with not too much difficulty and was flying again with a new sense of confidence. Being able to take a model home, in flying condition was a wonderful new experience for me. To fly without worrying about destroying the model was another new experience.
The handling of the Ready 2 suited me just fine, and it was able to cope with our local flying site. This is a shared resource with full sized planes running off a grass airstrip. Alongside this airstrip is a hedge, which creates some lovely vortexes to change a perfect landing to an occasion of exploding violence as the wind catches the wings. So hard landings are commonplace at our strip if the wind direction is unkind.
Having regained some confidence in flying I built an ARC Jupiter, which I duly crashed very hard on its first flight. This was due to excessive movement of the ailerons. Having dusted the plane off and reduced the servo action on the ailerons, the Jupiter flew very nicely indeed - until a short while ago, when a vortex caught it on take off and it cart wheeled down the runway with the wing separating into its two halves. The same day I demolished the Ready 2, after a hand launch. The Ready 2 was getting very near to retirement anyway so that was no hardship and a new replacement is waiting to be built.
I did feel that I would like another high wing plane. I thought that the ARC Cessna looked a bit too much like a Ready 2 but for a lot more money. So I ordered the ARC Beaver.
 Description
This is a new model from ARC Modelfly, it follows ARC's successful recipe
for manufacturing a durable plane, which can withstand a fair amount of
unreasonable punishment. Having already built a Ready 2 and a Jupiter,
I was interested to see if the new building instructions really had been
improved. The answer is yes - generally. The large sheet containing all
the clear photo instructions is entirely in Italian. On the reverse there
are some very good cutaway illustrations showing the hidden construction.
There is now a separate booklet containing translated instructions in English, French, German and Spanish. I am happy to say that the English translation has been done by someone who actually knows English! As apart from the ARC's web site, which appears to have used a computer software translator. The Beaver web page description states "The BEAVER EXPERIMENTAL is a model that it likes!" whatever that means…
I did find a couple of ambiguities as I completed the build but nothing too drastic.
 Construction
The wings are exactly the same as the Ready 2 except for using ornamental
struts for scale appearance. The tail feathers also are the same as the
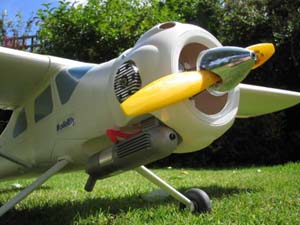
Ready 2. The rudder has a different profile to the Ready 2. The fuselage
is very different in that the engine mount firewall is glued in to the
very front of the fuselage. Good cowl mounts are firmly glued into the
front of the fuselage and the support of the cowl is very stable.
The 2 rear bulkheads are similar to the Jupiter where one is for the wing and the other is for the undercarriage. The undercarriage is thankfully of a different design, and is of a flattish section. So fore and aft strength is now much better. All the build steps went reasonably well. But I did deviate from the instructions a couple of times.
The cowl is supposed to have a slot cut in it so that it can be slid forward with the exhaust installed. I chose to let the cowl remain intact so that the mount to the fuselage is a complete circle; this is to retain the strength of the cowl. I am happy to fiddle with the cowl a little longer for engine and fuel pipe access.
 As
the supplied wing bolt is a strange size (M7 maybe?), and from previous
experience with my Ready 2, I use .25" x 2.5" steel Whitworth
bolt and nut. I like Whitworth as the coarse thread helps prevent over
tightening. Anybody ever notice that plastic wing bolts can actually wear
out steel nuts?
As
the supplied wing bolt is a strange size (M7 maybe?), and from previous
experience with my Ready 2, I use .25" x 2.5" steel Whitworth
bolt and nut. I like Whitworth as the coarse thread helps prevent over
tightening. Anybody ever notice that plastic wing bolts can actually wear
out steel nuts?
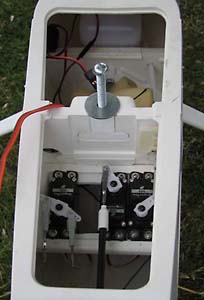
The instructions recommend removing the engine mount before fixing the firewall in place. However it is so much easier to handle the firewall installation with the engine mount still attached.
The receiver aerial is shown as exiting the fuselage at the front edge of the wing. This seems somewhat vulnerable to me; wing fitting and removal could easily catch and yank the wire. As could an unfortunate premature meeting with the ground! So I routed my aerial wire so that it exits behind the wing.
 Gotcha!
I did find a couple of 'Gotchas'.
The instructions in step 11 show that one has to glue one end of the strut ends into the struts. Naturally I glued both strut ends in, only to find in step 46 that one must not glue the other strut ends into the struts. No big deal, as this is for easy assembly of the wing and struts onto the fuselage. I merely have to screw and unscrew the fuselage ends of the struts each time I fly the plane.
Step 38 clearly shows on the photo that the distance from rear of engine mount to front of prop driver to be 102mm. However the written instructions state that the distance should 95mm. 95mm is a bit tight for prop clearance. I emailed ARC about this and a few days later I had a reply from Ripmax stating that it did not matter - sure… Ripmax also stated that there were no problems with Ready 2 and Jupiter undercarriages breaking - yeah!
 On
a plus side there is a very good fuel tank support on the undercarriage
bulkhead. The centre of gravity is marked on the side of the fuselage
by 2 small pips. I pleased to find that it was spot on when I checked
it. This is with an Irvine 53 set at 102mm.
On
a plus side there is a very good fuel tank support on the undercarriage
bulkhead. The centre of gravity is marked on the side of the fuselage
by 2 small pips. I pleased to find that it was spot on when I checked
it. This is with an Irvine 53 set at 102mm.
I enjoyed the build, and spent longer than I might have, because it was so relatively trouble free.
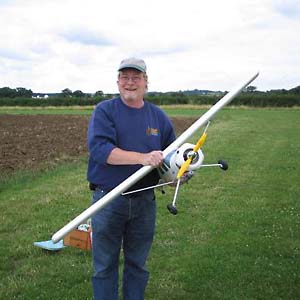
Flying Characteristics
It was a 'so so' day for the first flight, the wind seemed constant at
about 10 mph.
I wondered what taxiing and take off would be like as there is no tail wheel steering. It was fine and steered wherever I wanted. Take off was easy and uneventful and the plane needed no trim adjustments. I was really pleased with the flying characteristics.
 I
am not a competent flier to see what the Beaver flies like upside down
or in knife edge, there again I suppose the full size version rarely does
those manoeuvres.
I
am not a competent flier to see what the Beaver flies like upside down
or in knife edge, there again I suppose the full size version rarely does
those manoeuvres.
First landing looked to be just spot on - until the wind gusted on another direction at the moment of truth and the Beaver unceremoniously dumped itself for the last foot of height onto the ground. No harm done.
Next flight had another gust just on take off, despite aborting the Beaver still turned sharp right and took off and buried itself on the hedge beside the runway. After extricating the plane from hedge I was relieved to see that yet again there was absolutely no damage. The strong cowl mounts are more than adequate for the abuse I give to my planes.
Next take off was trouble free as was the landing. As the wind was steadily increasing it seemed to wise call it a day and take home a plane that did not need any repairs.
 The
Beaver has now had about 6 further flights in quite gusty conditions.
Take off is easy unless the wind veers whereupon the Beaver turns quickly
into the direction of the wind. It continues to fly in a very balanced
manner. So much so, that it is quite hard to do a loop without it turning
out at the top. The magnetic hedge has yet again attracted it (see wind
veer above), but still no damage or marks.
The
Beaver has now had about 6 further flights in quite gusty conditions.
Take off is easy unless the wind veers whereupon the Beaver turns quickly
into the direction of the wind. It continues to fly in a very balanced
manner. So much so, that it is quite hard to do a loop without it turning
out at the top. The magnetic hedge has yet again attracted it (see wind
veer above), but still no damage or marks.
Conclusions
This is a really nice plane to fly, and I can see that I will have a lot
of pleasure with it in the future. The plane gives an air of confidence
because of its "chunkiness" and other fliers have said that
the semi scale appearance really lends itself to having scale painting.
ARC state that it takes a day to build. In reality I would say that 4
or 5 evenings are nearer the mark to make a good job and to enjoy the
experience.
ARC
Modelfly Beaver Experimental is available from:
All Ripmax Stockists
| Technical Details - ARC Modelfly Beaver Experimental | |
| Manufacturer | ARC Modelfly |
| UK Distributor |
Ripmax |
| Aircraft Type: | Semi-Scale Powered Aerobatic Trainer |
| RRP | RRP £100 - £120 |
| Wingspan | 1570 mm. / 61.75 in. |
| Wing Area | 39 sq. dm/ 605 sq. In |
| Wing Section | Symmetrical Section Airfoil |
| Engine | 2
stroke 6.5 - 8.5 cc. / .40 - .51 cu.in 4 stroke 10 - 12 cc. / .60 - .70 cu in |
| Weight | 2.800g. / 6.00 - 6.30 lbs |
| Number of Channels: | 4-5 Channel Radio |
| Control Functions: | Elevator, Aileron, Throttle, Rudder, Flaperons (optional) |
| Construction | Plastic ARTF |
| Likes | Dislikes |
|
|
Please
mention 'Flying Sites' when contacting
Ripmax
| Info Panel |
|
ARC
Modelfly
Beaver Experimental |
| Comments: This is a really nice plane to fly, and I can see that I will have a lot of pleasure with it in the future. |
| Price: £100 -120 |
| See Technical Details Below |