

New Series! New Series!
| Building The Graupner/Heim BO 105 |
 The
full sized BO 105 is a twin turbine engined helicopter made in Germany
and is commonly used for police and air ambulance in the UK, so there
are plenty of examples to choose from for the scale model. The purpose
of this article is not to go into every detail but more to point out the
areas not very well covered in the manual.
The
full sized BO 105 is a twin turbine engined helicopter made in Germany
and is commonly used for police and air ambulance in the UK, so there
are plenty of examples to choose from for the scale model. The purpose
of this article is not to go into every detail but more to point out the
areas not very well covered in the manual.
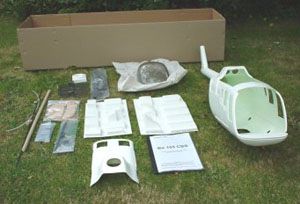
The BO 105 kit is the latest from Graupner/Heim and is for use with the Uni-star or Uni-expert mechanics and is good value at £220. I will be using the Uni-star, which I have had for some time and have used in an Agusta 109, a Sea King, and in pod & boom form. It is always best to use mechanics, which have been flown and fully tested, as accessibility is more of a problem once fitted in the fuselage.
 The
fuselage is made of epoxy glass and is in 3 sections, the main section,
the top section and the rear part of the vertical fin. The general finish
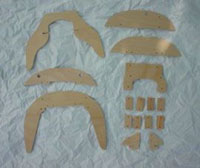
is very good and all the window holes are pre-cut. Also in the kit is
the wood pack, which again is pre-cut and of good quality ply, ABS mouldings
from which the horizontal fins are cut and joined, a pre-cut window set,
tail drive shaft, carbon rod and bellcrank for rudder control, and an
instruction manual in German! The 40-degree gearbox for the tail drive
is not included in the kit but is available from Graupner/Heim at around
£45.
The
fuselage is made of epoxy glass and is in 3 sections, the main section,
the top section and the rear part of the vertical fin. The general finish
is very good and all the window holes are pre-cut. Also in the kit is
the wood pack, which again is pre-cut and of good quality ply, ABS mouldings
from which the horizontal fins are cut and joined, a pre-cut window set,
tail drive shaft, carbon rod and bellcrank for rudder control, and an
instruction manual in German! The 40-degree gearbox for the tail drive
is not included in the kit but is available from Graupner/Heim at around
£45.
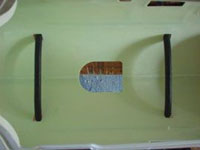 Building
starts by drilling the skids and fitting them to the cross sections with
self-tappers. One skid is then removed to slide the undercarriage into
the fuselage through the pre-cut holes. The ply formers are fitted with
captive nuts and lined up inside the fuselage with plastic brackets holding
the undercarriage to the formers. Some fiddling is now needed to get the
model sitting level on its undercarriage before permanent fitting of the
formers to the fuselage with epoxy resin. I had to sand the edge of the
formers a little to achieve this.
Building
starts by drilling the skids and fitting them to the cross sections with
self-tappers. One skid is then removed to slide the undercarriage into
the fuselage through the pre-cut holes. The ply formers are fitted with
captive nuts and lined up inside the fuselage with plastic brackets holding
the undercarriage to the formers. Some fiddling is now needed to get the
model sitting level on its undercarriage before permanent fitting of the
formers to the fuselage with epoxy resin. I had to sand the edge of the
formers a little to achieve this.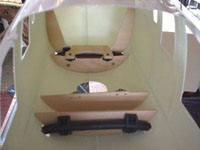
The remaining ply plate and lower formers are temporarily bolted to the mechanics and placed into the fuselage along with the upper mounting plate. A lot of measuring and lining up is now required before permanently fixing the upper and lower formers to the fuselage with 1 hour epoxy. I spent some time getting everything lined up nicely as once fitted its to late. When the epoxy has hardened the mechanics can easily be removed by unscrewing the six mounting bolts.
In the next part I will be fitting the tail drive and rudder control.
This page has been contributed by Jeff
Barrington
Web Site:
Mid Devon Heli Club