
| Finishing The Scorpio Spitfire |
May I start by wishing all followers of Electro Flyer and "Flying Sites" a Merry Christmas and a very Happy New Year.
Not too much this month I'm afraid. I have been struck down with the dreaded Flu Virus - or what my doctor called "Exhaustion leading to Bronchitis" and booked me off work for 2 weeks.
Anyway, whilst convalescing I have been sat in the warm in the kitchen with my building board on the table to dabble at the Spitfire when I felt that I had the energy - which wasn't very often as anyone who has had this virus will tell you!
No real problems with the Spit. I decided not to have the undercarriage fitted and so went ahead without out it - I just though she would look better in the air without wheels hanging down.
Once I had done all my prep - see last months article - I got back down to construction.
Fairly straightforward and according to plan, on the whole. The tail plane fitted nicely, having slotted for and added the rudder and elevator horn (1/32 ply) but did need a fair bit of filling where it re-joined the fuselage.
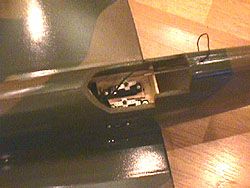
 Whilst
this was drying I opened up the servo hole in the wings and mounted the
servos. I used mini servos and they obviously expect micro ones as I did
not need the supports adding for the covers as they rested nicely on the
servos - still this all added to the weight saving.
Whilst
this was drying I opened up the servo hole in the wings and mounted the
servos. I used mini servos and they obviously expect micro ones as I did
not need the supports adding for the covers as they rested nicely on the
servos - still this all added to the weight saving.
Simple matter of sticking the servos to a balsa plate then putting this through the hole in the wing, fixing the pre-bent aileron pushrod wires in place with small tubes glued to keep them in place and once the radio was centralised positioning the servo for neutral on the aileron and fixing the balsa plate to the ply plate which was already in the wing. Nylon chords were already in the wings to draw the servo extension leads through to the centre opening. I did use tape to ensure the extension leads didn't come adrift, as they would not be easy to get back through if they came apart at any point.
Once in place the original cover was put back in place and secured with a couple of small pieces of sellotape - nice job really!
 With
both done and the tailplane now set I did a similar routine with the rudder
and elevator pushrods. Again these were pre-bent so put them in place,
add small tube to the wire to hold secure and then once the radio is centralised
and the rudder and elevator are neutral - by moving the servo in its top
tray - I fixed the top tray to the servo main tray (as covered in my modifications
last month).
With
both done and the tailplane now set I did a similar routine with the rudder
and elevator pushrods. Again these were pre-bent so put them in place,
add small tube to the wire to hold secure and then once the radio is centralised
and the rudder and elevator are neutral - by moving the servo in its top
tray - I fixed the top tray to the servo main tray (as covered in my modifications
last month).
The pushrods were epoxied to the bulkhead behind the servos and to the
fuselage where they exited and that was that for the controls - the speed
controller already being in place on the back of the motor.
Once all was dry I fixed the wings in place - these were a nice fit but not that easy to keep hard against the fuselage whilst the epoxy dried, so I turned her upside down, propped the wings level and added some weight to the fuselage whilst she dried - ended up looking quite nice.
 The
spinner was a really complicated affair, using ply and a vac-formed spinner
to produce the final unit. As I wasn't having any undercarriage I felt
this would be weak and not last for more than a couple of flights so I
went for a standard spinner which was not actually much heavier in total.
Mine is actually white but will be replaced with a black one (or painted)
eventually. The vac-formed one is actually Sky Blue.
The
spinner was a really complicated affair, using ply and a vac-formed spinner
to produce the final unit. As I wasn't having any undercarriage I felt
this would be weak and not last for more than a couple of flights so I
went for a standard spinner which was not actually much heavier in total.
Mine is actually white but will be replaced with a black one (or painted)
eventually. The vac-formed one is actually Sky Blue.
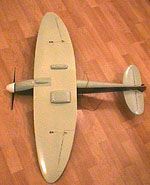
She was quite looking the part now.
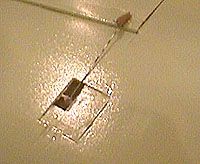
The battery box protrudes to the under-surface of the wings and is flush with them. Something that you have to check when getting ready to fix the wings - you have to put the battery box former in place loose, fix the battery box to it and add the wings and then move it all to be perfectly flush with the wings. You then hold it in place, remove the wings and epoxy the former and battery box in place.
 Once
the wings were set a vac-formed radiator piece is added to some balsa
and ply to make a sliding hatch cover for the battery box - very nice
idea this that could be utilised in a lot of electric models.
Once
the wings were set a vac-formed radiator piece is added to some balsa
and ply to make a sliding hatch cover for the battery box - very nice
idea this that could be utilised in a lot of electric models.
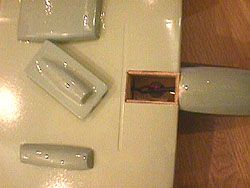
The pictures show it with it off and on - very nice way of doing it. You can also see the other vac-formed parts (all pre coloured), which I epoxied to the underside of the wings. I did this securely as these are effectively what it will land on, as it has no undercarriage. The reason they look shiny is that I used 2 ton crystal clear epoxy and gave all the parts, plus the front and just behind the wings a thin coating to protect them during landing. This is very thin but this stuff set like rock so hopefully will protect it during a landing.
 I
have also included a general view of the underside to give an idea.
I
have also included a general view of the underside to give an idea.
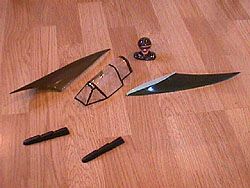
She was really looking nice now and just needed the finishing touches, which were nicely done, again, in the kit using vac-formed parts, which included wing fairings, exhaust stacks, canopy and pilot.
I
painted the pilot and lines on the inside of the canopy and cut the exhaust
and wing fairing to the lines marked on them.
 A
bit of sanding for the wing fairings to smooth them to the profile and
all were epoxied in place. Again I would have probably have used some
other glue but as they were going to be close on contact during landing
I opted for epoxy.
A
bit of sanding for the wing fairings to smooth them to the profile and
all were epoxied in place. Again I would have probably have used some
other glue but as they were going to be close on contact during landing
I opted for epoxy.
The canopy is held in place with small pieces of clear tape - I put some on the fuselage first, as recommended, so that it can be opened for radio access and with just one side eased off it hinges nicely on the other side.
As I didn't want to obstruct the radio gear I actually cyano'd the pilot to the top of the canopy so that he hinges out with it to leave the gear accessible.
That just left the decals to fix. All waterslide and all perfect - not at all like the experience I had had with the Pfalz in an earlier review.
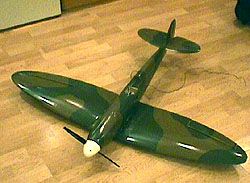
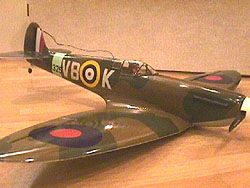 So
there she is. Just about finished. I will sort out the spinner and test
fly her as soon as the weather and my health permit. But I have got to
say that I am very, very pleased with her and she looks every bit a Spitfire
and I really don't think that anyone after a near scale sport/park flyer
of this type of model could be disappointed - I am certainly not!
So
there she is. Just about finished. I will sort out the spinner and test
fly her as soon as the weather and my health permit. But I have got to
say that I am very, very pleased with her and she looks every bit a Spitfire
and I really don't think that anyone after a near scale sport/park flyer
of this type of model could be disappointed - I am certainly not!
So that's about it for this month. I have got hold of some nice paints to test on foamies to finish the Pfalz as the decals were no good and will include a finished picture of her next month - if I can stop flying her around the back garden long enough to paint her!
I will also try and do the test flying on the Spit and report on that next month.
Not sure what else to do next month yet. I am building - just a Christmas project - a 13 ½" span Peanut Scale Mustang which I may convert to electric-round-the-pole just for fun so I may cover that.
The flight simulator leads are still going well, especially with the latest version so I get many happy bad weather days flying on the computer.
A very happy electric New Year to you all - get in touch about anything modelling wise at all, or suggestions and don't forget, if there are any suppliers out there that want their products reviewing here just get in touch so that we can bring as wide a range of electric flight items to view as possible.
If you have any questions then please get in touch with
Mark at:
ratby@bizonline.co.uk
or check out his web site at:
www.bizonline.co.uk/ratbyaeroplanes