
| Finishing The Pfalz |
 Here
we are in November already - where has the season gone? Time
and weather has limited things a little this month but I have managed
to get the Pfalz finished.
Here
we are in November already - where has the season gone? Time
and weather has limited things a little this month but I have managed
to get the Pfalz finished.
I visited my brother in Norfolk this month and took the Radio Queen and my Mirage electric models down with me, as he was dead keen to see some models fly. We only had a school playing field no bigger than a football pitch to fly from but all went well and both models flew a treat - hopefully he has been re-bitten with the electric bug and will resume work on his own model - an own design V tail electric job of about 48" span - looks nice, might just get him to let me kit it, will let you know if I do.
Bristol
Brigand
I have also been pestering my father to let me have his plans for a Bristol
Brigand - little known aircraft that followed the Beaufighter - he used
to fly these in Malaya back in the early 50's. There do not appear to
be any real ones left as they used to fall apart in the air when the spinners
went off balance, ripping the engine out of the wing, or the ammunition
exploded in the guns and took a wing off. Either way most of the Scorpion
squadron and 54 squadron were wiped out, not by the Malay bandits but
by their own planes.
If I can get these then I would like to go for a European record - I saw pictures of the 130 odd inch span Fortress - B50 something anyway - and thought that I could do something bigger easily with Team Gear units. The spec I saw on that one meant that it needed 16 cells per engine x 4. Team Gear units could have done it with ease using 14 cells per Sport Twin saving a lot of weight. So I thought something bigger with 2 Sport Quads and 72 cells should go a treat - we'll see!
 Meanwhile
Back at the Pfalz Factory!
Meanwhile
Back at the Pfalz Factory!
Back
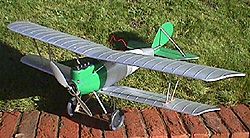
to my review that I started last month. The
model is now finished and some brief details of the construction follow.
Most
of the model went together as per the instructions and was fairly straightforward.
Quite a bit of time can be saved by reading ahead as you can get on with
other parts whilst the current parts have the epoxy dry. Things such as
painting and cutting out the struts, putting the wheels together and the
like can be done whilst other bits dry.
Useful
Tips
Here is how it went together and my tips to make things easier and clearer.Lets
cover my tips first. The
instructions say use a very sharp knife to make the cutouts in the body
and wings. This is OK but there is always that little extra distance you
go which leaves a slit in the foam you didn't want - so my advice on this
is to use a very fine sharp drill in your cordless drill or Dremel and
make the cuts carefully with this, it will be much neater and will go
all the way through cleanly.
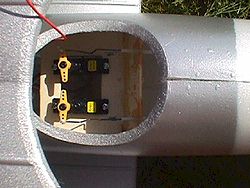
 Early
on you have to fit the servo tray, but as it will not be very accessible
after fitting, I dry fitted it first, popped the servos in and aligned
then with where the servo arms were in line with the pushrod positions,
pre-drilled them, then took it all out and fitted the tray, knowing that
I only had to pop the servos in place and add the screws after fitting-
made life much easier than it would have been trying to drill it afterwards.
Early
on you have to fit the servo tray, but as it will not be very accessible
after fitting, I dry fitted it first, popped the servos in and aligned
then with where the servo arms were in line with the pushrod positions,
pre-drilled them, then took it all out and fitted the tray, knowing that
I only had to pop the servos in place and add the screws after fitting-
made life much easier than it would have been trying to drill it afterwards.
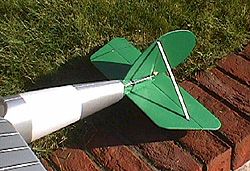
After the former part you make the hinges on the rudder and elevator with tape, Sellotape is best as it is fairly clear and sticks well to the foam. I added the tail struts after joining the fin to the tail plane to ensure it kept everything square when these were later joined to the fuselage - the instructions do not say to do this until later.
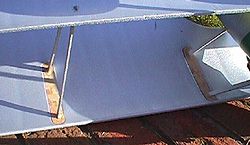 It
is all fairly straightforward, glue in formers etc. The wings however
have 1/32 ply facings where the struts go through which have to be epoxied
to the wings, upper surface on the lower wing and lower surface on the
upper wing. As they are very curved surfaces this is quite a challenge.
Probably best to use 10 minute epoxy - I used 30 minute - and make up
some half width Sellotape strips, with the ends folded over to assist
removal, and after glueing put one in the centre then one at each end
to hold it around the curved surface. With 5-minute epoxy you can keep
making sure they are pressed in place whilst it dries.
It
is all fairly straightforward, glue in formers etc. The wings however
have 1/32 ply facings where the struts go through which have to be epoxied
to the wings, upper surface on the lower wing and lower surface on the
upper wing. As they are very curved surfaces this is quite a challenge.
Probably best to use 10 minute epoxy - I used 30 minute - and make up
some half width Sellotape strips, with the ends folded over to assist
removal, and after glueing put one in the centre then one at each end
to hold it around the curved surface. With 5-minute epoxy you can keep
making sure they are pressed in place whilst it dries.
In-between times (whilst waiting for glue to dry) I made the wheels - quite tricky as they are from two halves of very thin ABS - more glue on my fingers than on the wheels I think! I also painted the struts, lengths of obeche, silver whilst waiting for glue to dry. These struts are cut to length according to full size drawings on the plan, however, there did not seem to be enough in the kit to do them all so I used some of my own material.
 When
I got to the wing joining stage (using the templates from the box packaging
- and very nicely dome they are too) I found that a lot of them were not
needed and the front and rear upper central struts were numbered wrongly
on the plan - either that or I have made it wrong - but it did seem to
go together OK, so just ignore the smallest pieces on the plan, unless
you can find somewhere for them to go!
When
I got to the wing joining stage (using the templates from the box packaging
- and very nicely dome they are too) I found that a lot of them were not
needed and the front and rear upper central struts were numbered wrongly
on the plan - either that or I have made it wrong - but it did seem to
go together OK, so just ignore the smallest pieces on the plan, unless
you can find somewhere for them to go!
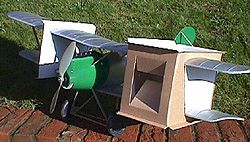
Everything else was fine, I put the motor and gear box together (when will they produce a motor with the shaft the right length for the gearbox so you don't have to file it away?) and fitted it having tested it with the radio gear and hardwired it to the speed controller (the less connectors the better). Fitted the radio gear and elevator and rudder pushrods, put the wings on - the templates worked perfectly, just make sure the are square to the body, added the undercarriage, axle and wheels and there she was, almost done.
Just needed some touch-up paint and the decals. As time was a bit tight to get the review in I decided to do the decals and leave the paint for later so that I could report on her flying. A drop of luke warm water and washing up liquid as suggested, dropped the decals in and let them start to float. Went to put them on the model and they all disintegrated!! For what ever reason they were all full of cracks, although they had been kept safe and dry, none of them were useable, so she doesn't look quite right and I will have to do some fancy paintwork - I was not too impressed with this as you can imagine!
They recommend not glueing the battery box in place until she is finished so that you can move it to adjust the CofG but I have no choice but to fix it due to the oversize battery pack I was using. I set it as far back as possible but she still came out a fraction nose heavy. As that meant gentler controls I left it as it was for the test flight with the intention of adding weight to the rear if needed afterwards.
 First
Flight
First
Flight
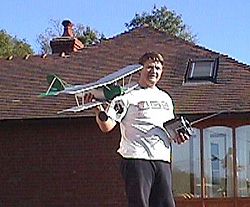
So here we were on an absolutely beautiful Sunday afternoon at the end
of October - hard to believe - and I just had to try her out. As our garden
is elevated she has a good head start from the word go. Checked all of
her controls, put her on full throttle and launched her, ever so gently,
into wind (straight down the garden). She went off gently, slowly and
gracefully climbing quite steeply. A bit of down trim to hold her in a
more scale like climb and made the first turn, after a fraction of right
rudder.
No problem at all, a real treat. Very controllable and stable - I will add a little tail weight to increase her responsiveness but that's about it. A few minutes later she seemed to be losing power. I was a little surprised but as it was the first real run the batteries had had, and the first time I had used the car peak detect charger I gave her the benefit of the doubt. I also felt that the prop might not be producing quite enough thrust.
A re-charge, change from a 9x6 to a 10x7 ASP slow fly prop and off we went again. Much better this time, loads of power and a really good climb out, but again she started to slow after a few minutes, then stutter, then stop altogether - OOPS! - Quick position for a landing - no problem, down to earth nice and gently. I checked her out and found that the plastic gearbox has seized. Now maybe I had done something wrong as this little gearbox is new to me but I had followed what instructions I had and really expected more that a flight and a half from it.
Anyway, I took her into the machine shop and did some re-designing of the gearbox and I will report on this next month. All in all I am very pleased with her, a few changes to the instructions and plan as mentioned but either way you end up with a very nice little park flyer which will be gracing my rear garden on calm evenings - just the decals spoiled it, what more could you ask for?
A Spitfire I hear you say - OK, I will start her as soon as I get chance and hopefully start her review next month. Enough for now. I have gone on quite long enough this month!
Don't forget, if there are any questions just ask.
If you have any questions then please get in touch with
Mark at:
ratby@bizonline.co.uk
or check out his web site at:
www.bizonline.co.uk/ratbyaeroplanes