
| Mark Returns To Revamps His 3 Metre Graupner Cirrus |
At last I get time to sit down and write another article for Flying Sites. A miserable winter, too cold to get out into the workshop and too windy to fly - if I had any time anyway!
 Well,
last time I mentioned that I would be covering the restoration of my Graupner
Cirrus - so here we go!
Well,
last time I mentioned that I would be covering the restoration of my Graupner
Cirrus - so here we go!
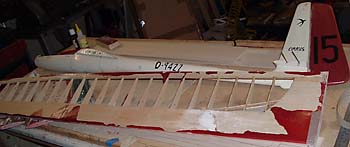
The Cirrus, for those who don't know them, was a beautiful kit that appeared in the late '60's. It had a three part plastic fuselage that was glued together and built up wings, fin and all flying tail surfaces. It has a wingspan of 3m and always flew like a dream!
I had the Cirrus for my 18th Birthday - too long ago to even try and work out how old it is - and loved it dearly. She had a few bumps and knocks over the years and eventually got retired to the loft. I just couldn't bear to part with her however much of a mess she was.
So, some time towards the end of last year I decided to resurrect her. The fuselage was too much of a mess to do anything with, I though of glass clothing her but that would have just made her too heavy, so I decided to start from scratch with the fuselage and create a new one in balsa.
The wings and tail were a real mess but I felt that with time and patience I could strip the tissue off, repair the cracked ribs, do some filling and get them back to some sort of order.
So here comes the painful bit - those of a nervous disposition when it comes to the Cirrus should look away now!
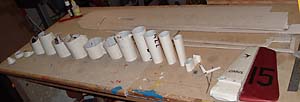
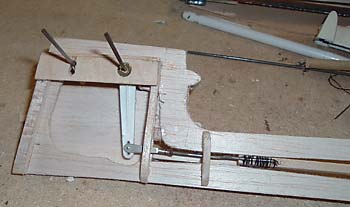
I had managed to find my original plans and instructions for her and realised that the radio installation instructions were full size - perfect to make a start on the keels.
 I
then took out my ruler and marked regular intervals along the old plastic
fuselage, marking these on the plan as I went so I knew what was what.
I
then took out my ruler and marked regular intervals along the old plastic
fuselage, marking these on the plan as I went so I knew what was what.
I then took out my hacksaw and commenced the operation of cutting my beautiful old Cirrus body into lots of pieces! Each of these gave me the profile of the fuselage at the marked points along the body. I was then in a position to make formers. Pretty easy really, just put the pieces onto a piece of balsa, mark around it and then reduce the overall size to allow for a thin balsa skin.
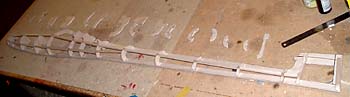 Next
I split the formers in half, cut notches top and bottom so they fitted
over half of the thickness of the keel.
She was now starting to take shape. Once the first half formers were fitted,
the keel removed from the building board and the other halves fitted she
was looking really nice. I added some stringers and cross braces to give
a fairly sturdy main framework as I went.
Next
I split the formers in half, cut notches top and bottom so they fitted
over half of the thickness of the keel.
She was now starting to take shape. Once the first half formers were fitted,
the keel removed from the building board and the other halves fitted she
was looking really nice. I added some stringers and cross braces to give
a fairly sturdy main framework as I went.
I extracted the original wing tubes and crank for the all-flying tail plane and built these into the structure as I worked. I also used block materials to get some of the more awkward shapes right.
 Once
I was happy I covered the fuselage in 1/32 sheet. I used several panels
to get everything to shape, soaking them in hot water on the outside surface
to allow them curve around the formers. A few strips added in here and
there to complete the body.
Once
I was happy I covered the fuselage in 1/32 sheet. I used several panels
to get everything to shape, soaking them in hot water on the outside surface
to allow them curve around the formers. A few strips added in here and
there to complete the body.
The fin was beyond salvage it so I built a new one using the old one and the plans I had as templates. A good sanding, some filler and more sanding, and she was looking pretty good.
For the wings I just spent hours carefully stripping off the years of tissue, followed by replacing a few ribs and adding some strengthening and glue where needed. Basically they came out 95% original. Some filler and sanding gave the end result. The tail surfaces really had come to the end of their life so I used them, again combined with the plans to make new ones, retaining the original pivot tubes.
 So
there she was, ready to cover and not looking too bad. The only thing
I will have to do in the future is make a nice new canopy for her - the
original one was pretty much scrap so I did a makeshift one out of balsa.
So
there she was, ready to cover and not looking too bad. The only thing
I will have to do in the future is make a nice new canopy for her - the
original one was pretty much scrap so I did a makeshift one out of balsa.
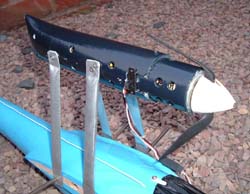
 As
I wasn't sure if she would be strong enough to survive I decided to just
use what covering I had in stock - so she ended up as blue on top and
black underneath - all in Solarspan.I
did my usual trick with printed letters and frame mount adhesive on Solar
Trim for the decoration.Push/pull
wiring was used for the rudder, as per my original. Thin dowel pushrod
attached to the crank was used for the elevators/tailplane.
As
I wasn't sure if she would be strong enough to survive I decided to just
use what covering I had in stock - so she ended up as blue on top and
black underneath - all in Solarspan.I
did my usual trick with printed letters and frame mount adhesive on Solar
Trim for the decoration.Push/pull
wiring was used for the rudder, as per my original. Thin dowel pushrod
attached to the crank was used for the elevators/tailplane.
I hope you agree that she looks the part - and she came out at 6oz lighter than the original model, so that was very promising.
The day finally came to take her to the field and try her out. New bungee in hand off we went. A couple of test glides called for an ounce of lead in the nose and then I hooked her up and stretched out the line. Away she went - lovely - but I was a bit rusty and she left the line earlier than I would have liked her to resulting in a flight of only a minute or two. All the same I knew she was OK, light and floaty just like the original.
So I decided to give her a bit more stretch this time for a longer flight. Off she went - CRACK! - Whoops, not quite as strong as I had hoped. I had forgotten just how much force the structure was put under during a bungee launch.
The wings folded gracefully and she gently came to earth, wings still attached and the right way up. Amazingly very little damage, the wings, which attach via metal rods to tubes in the body had basically bent the tubes in half and cracked out of the body, but had not actually separated. In this way she came to earth gently and in one piece (so to speak).
I had a good look at her and realised that the choice of grain direction in the balsa blocking that held the tubes in place was running the wrong way.
 I
built in some extra strengthening, some hardwood cross members and mounted
new tubes onto those. I used my new hot glue gun to secure everything.
These are great! You can use loads of glue as it weights very little and
wrap it around things to make a really secure fixing. It's like having
controllable epoxy that goes off in 10 seconds and always a little bit
flexible to help reduce the CRACK during stresses.
I
built in some extra strengthening, some hardwood cross members and mounted
new tubes onto those. I used my new hot glue gun to secure everything.
These are great! You can use loads of glue as it weights very little and
wrap it around things to make a really secure fixing. It's like having
controllable epoxy that goes off in 10 seconds and always a little bit
flexible to help reduce the CRACK during stresses.
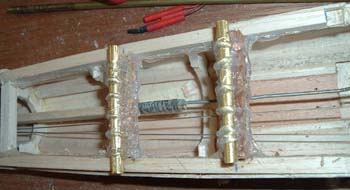
I also decided to make a power pod for her (Electric of course). I felt that at her age maybe she needed a more gentle launching technique. I had a dig around to see what I could use. I had some aluminium aerofoil shaped tubing, which I felt would do nicely for the mounts, slotting over the wing tubes before the wings went on.
I am going to try a Speed 400 motor first to see if it produces enough power for her, but will change to a 400BB if it needs more.
 I
found out some waste pipe, left over from when we built our house. Two
sizes (1 ½ and 1 ¼) which fit inside each other quite nicely.
The smaller one is also about the size of a speed 400. I worked out how
long it would need to be to fit a 7 cell sub-c pack, speed controller
and speed 400 in and cut a small piece to fit the motor and a longer piece
for the rest of the unit, allowing a little extra to make a closed end.
I
found out some waste pipe, left over from when we built our house. Two
sizes (1 ½ and 1 ¼) which fit inside each other quite nicely.
The smaller one is also about the size of a speed 400. I worked out how
long it would need to be to fit a 7 cell sub-c pack, speed controller
and speed 400 in and cut a small piece to fit the motor and a longer piece
for the rest of the unit, allowing a little extra to make a closed end.
I then got the heat gun out and melted the one end closed to make an even streamlined shape. The rest was fairly straightforward. Self tappers to hold the struts on, a slot for the speed controller switch, cut-outs in the motor section to give a push-and-twist lock mechanism to the motor part. I used self-adhesive draught proofing tape front and back on the motor to make it a snug fit in its tube, and then out came the glue gun to fix the speed 400 in place. Loads of holes for cooling, a quick spray of paint - job done!
I have yet to get the time and weather to test the power pod, but at least I know that the Cirrus is back and good for another few years of enjoyment. Why did they stop making the kit?
That's it for this time. Sorry for the long absence, I will try and get more to report on soon. Here's hoping for a decent year and some great electric flying weather.
Mark Stringer
If you have any questions then please get in touch with
Mark at:
sales@ratbyaeroplanes.com
or check out his web site at:
www.ratbyaeroplanes.com